Understanding Yield returns

I have seen people get confused when using yield

I will give a simple example

In our app, we are getting list of 50,000 employee details and printing them

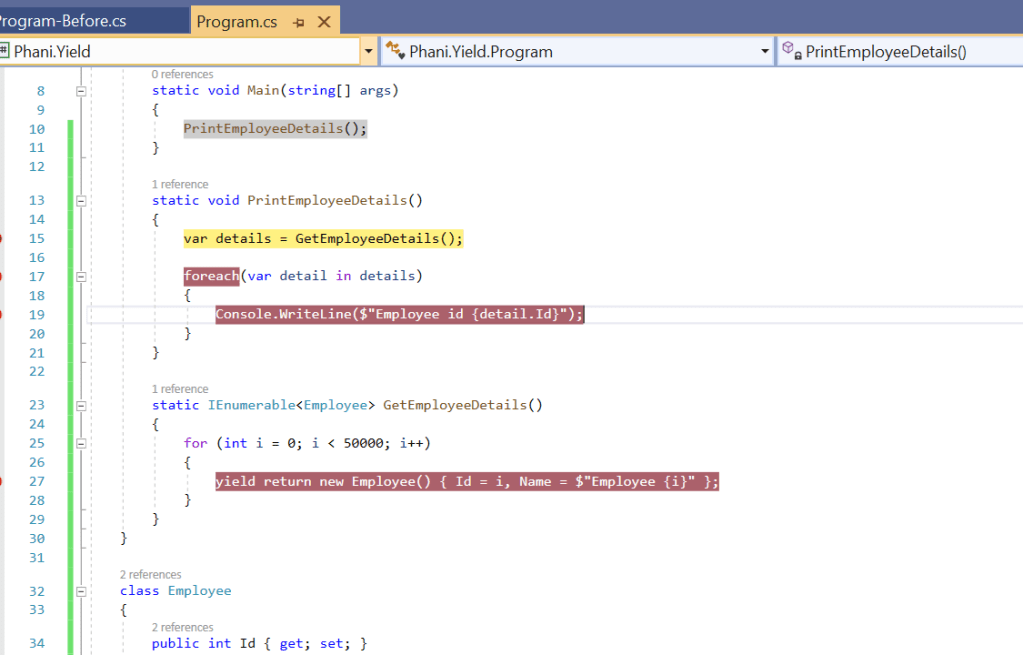
Usually without yield, the code looks like

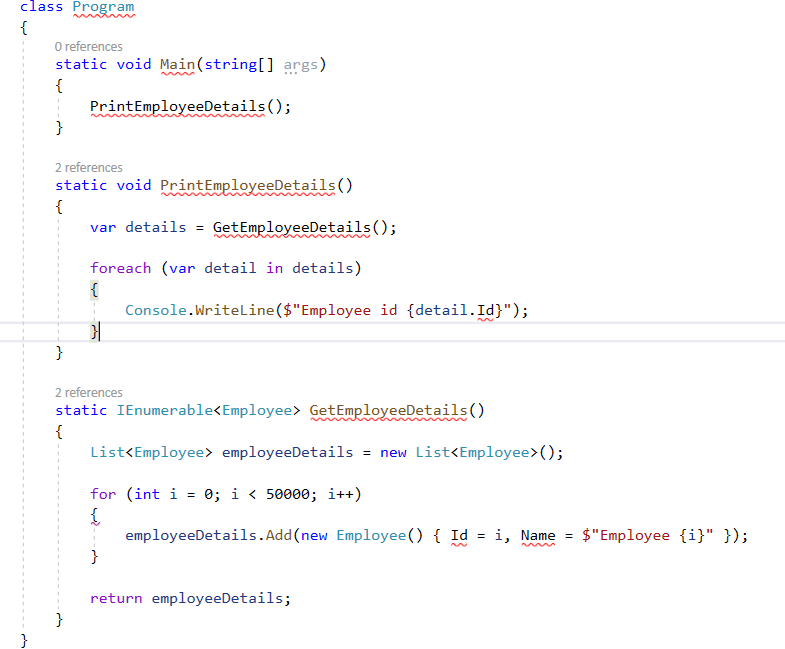
Here, we are getting list of 50,000 records which we can assume they are getting from api or from db.

Looping through the details and printing them

If we have lots of records, and iterating them will be a heavy process and affects memory usage and performance

One of the simple way is to use yield return to handle these type of situtations

The only change we do is remove list of details to return and just return only single yield return in for loop

Lets debug and see the results

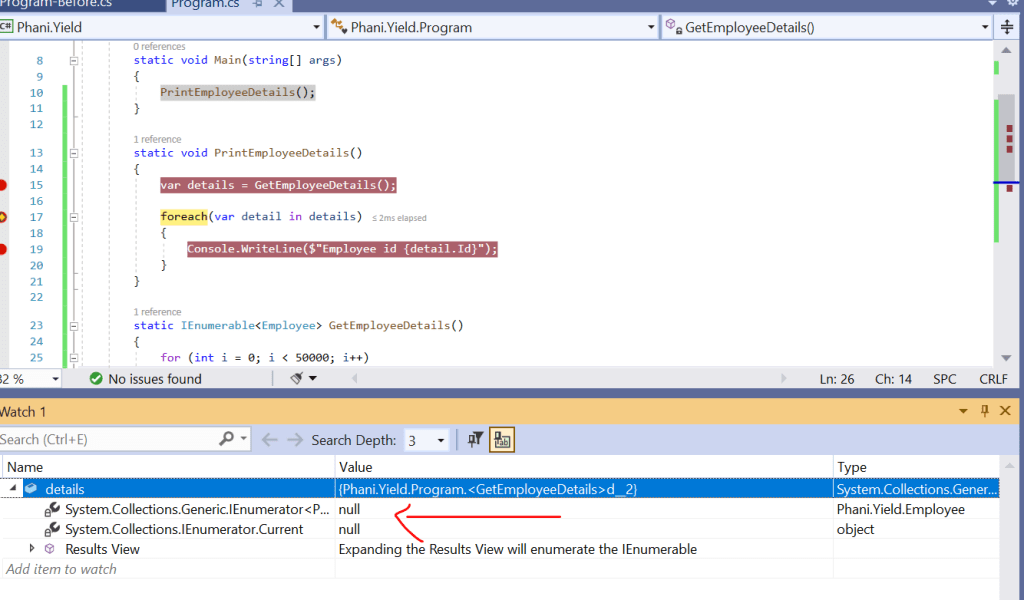
Here in watch window, you can see the details is empty. which doesnt have 50,000 records.

When looping through we get the single record and only stores single item in memory .

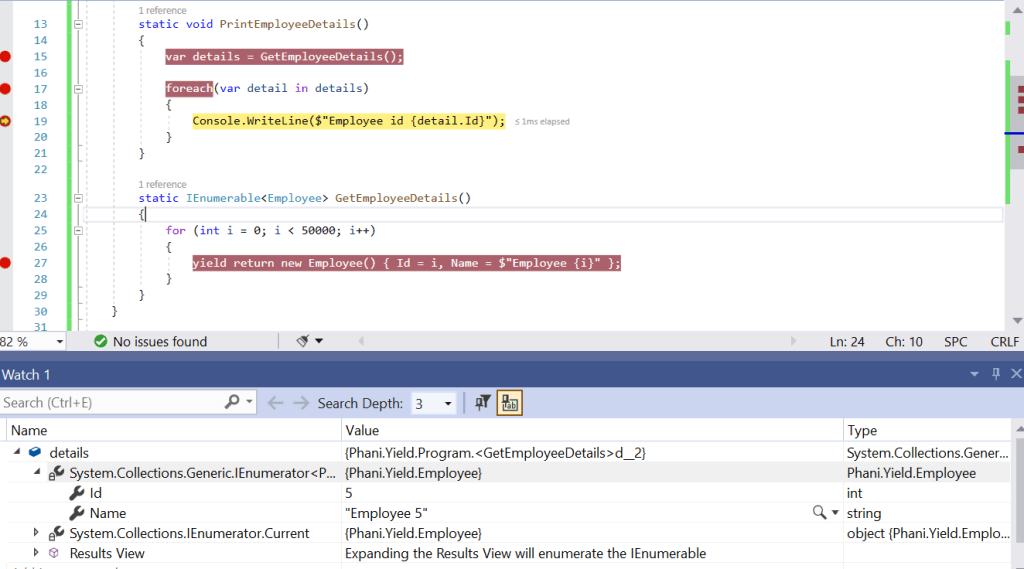
Now, i looped 5 times and you can see details object will have only one record. so it doesnt matter how many records the list will have.

Code in my Github: https://github.com/pbndru/Phani.Yield

Node js Express sessions using Redis

Express session is used as express middleware session for data persistence

Redis is an in-memory data-storage which uses key-value pair

Lets talk about simple example how the whole thing works

Lets think our application is using a load balancer like Nginx

so, when user logged in , our express middleware will create a cookie and session id and stores it in redis storage and cookie is saved in users browser. the cookie saved in browser will be used to identify the redis session

after login, the user will be using the access pages. so here when accessing pages, our express middleware will get the browser cookie and send it to redis to find matching session id. the express session variables can be accessed using req.session objects.

Lets dive to example.

Install redis https://redis.io/download

After installing redis, run redis server and redis client

These files will be in the path of download

Lets run our redis server with the refis.conf file path specified

redis-server.exe redis.windows.conf

Now the redis server is running. it says port 6379. it will be the default port of redis client

Now, run redis client by using redis-cli

Test the client able to communicate with server by entering ping and server will respond with pong

Now enter monitor to see sessions for client request

Here we run a simple app

Now, create a simple nodejs app and install required dependencies

Now, our app server has the express session with port 6379 and running a simple web app on port 3000

When run our app in browser, you can see our monitor redis client app will show the session id and cookie information with access and refresh tokens

If you open the browser you can see the cookie results with cookie name and value which will match session id in redis

Code in my Github: https://github.com/pbndru/phani.redissession

Asp.Net Core Health Check

Asp.net core has health check middleware which reports the health of our application.

Health checks are done through Http endpoints where we can see live monitoring of the services. We can alos see disk spaces, memory and server resources performance

Lets dive to the code

I created 3 projects where Phani.DeveloperApi and TesterApi are services and Phani.HealthChecks is a monitoring service

Lets install packages for our monitoring service. UI health checks is for better UI visiblity for dashboard.

run on port 5000

Now configure our services and middleware in starup

And add the health Uri for both Developer and Tester services in appsettings.json running on port 5001/5002

Now in DeveloperApi , we run on port 5001 and TesterAPI on port 5002

Install packages

Here we will be adding healthchecks in services and middleware

Now, lets run our 3 services

Now for the health checks , we can use the url: http://localhost:5000/healthchecks-ui

Here we can see the 2 services Phani.DeveloperApi and Phani.TesterApi are running and can see the health status. There will be different health check statuses like Healthy, UnHealthy,Degraded.

Code in my Github: https://github.com/pbndru/Phani.HealthChecks

Mocha Testing

Mocha is a JavaScript test framework for Node.js

Lets build a simple application to test this

Install mocha package as dev dependency

Now in test folder, we will be adding a simple test js file

Here we created a file named mochatests file in test folder.

The pattern for Mocha is

describe() – what group we are testing and can have nested describes for each feature

and for main parent we can set some values in before() and after() functions to execute something for once

And for child beforeEach() here it executes before each feature is completed. It means here after it() function we can set a value back and it() describes the test.

to run test, use npm run test in terminal

You can see all the tests are passed

Code in my github: https://github.com/pbndru/phani.mocha

Jest Testing

Jest is a javascript testing framework.

Lets build a simple application to test this

Install jest package as dev dependency

Now in test folder, we will be adding a simple test js file

Now in test folder, we will be adding a simple test js file

Here we created a file named phanidiscounts file in test folder.

The pattern for Jest is

describe() – what group we are testing and can have nested describes for each feature

and for main parent we can set some values in beforeEach() and afterEach() functions to execute something for once

And for child beforeEach() here it executes before each feature is completed. It means here after test() function we can set a value back and test() describes the test.

to run test, use npm run test in terminal

You can see all the tests are passed

Code in my github: https://github.com/pbndru/phani.jest

Chai Testing

Chai is a BDD/TDD assertion libraty for javascript testing framework

Lets build a simple application to test this

Install chai and mocha test runniner packages as dev dependencies

Now in test folder, we will be adding a simple test js file

Here we created a file named chaitest file in test folder.

The pattern for chai is

describe() – what group we are testing and can have nested describes for each feature

and for main parent we can set some values in before() and after() functions to execute something for once

And for child beforeEach() here it executes before each feature is completed. It means here after it() test function we can set a value here and it() describes the test.

to run test, use npm run test in terminal

You can see all the tests are passed

Code in my github: https://github.com/pbndru/phani.chai

Microservice Ocelot API Gateways

When building APIs we need API Gateway

There are many API Gateways available like Ocelot, Kong, Express API for Express Js

Here we will look into Ocelot

There is a possibility of single point of failure with Gateway API. So some projects dont prefer this approach

For microsrevice architecture, it’s good to use Gateway API

Here I will be showing simple microservices like Developer API, Tester API and Gateway API

For Developer API, run it in port 7001

For Tester API, run it in port 7002

For Gateway API, run it in port 7000

Lets add simple controller to return simple data

For DeveloperController look at below image

For Tester Controller

Now in Gateway API we add a ocelot.json for the microservice path urls and redirects

And we need to add JSON file path to Builder to read

Add Ocelot service as Middleware to startup

Now in ocelot.json lets add the configuration redirects for microservices. So here we add Developer API and Tester API paths with the ports of 7001 and 7002 where they are running

If you run our APP, for Tester API

If you run your developer API

Now if we run our Ocelot Gateway API, we can see the output with port 7000 running developer api

For Tester API,

Hope you enjoyed this article about how we can access microservices through API Gateway

Code in my Github: https://github.com/pbndru/Phani.ApiGateway