AWS EC2

EC2 represents Elastic Cloud compute

Ec2 instance is about you are requesting AWS to provide you a virtual server

Example:

An application requires huge storage. So depending upon that you will choose which type of ec2 instance is required. There are many types of ec2 instances available like General , Compute optimised, memory , storage, accelerated.
Now lets use general ec2 type instance

You can create Ec2 instance through the UI or through the CLI where you need to just select instance type and AWS will give you that instance type and AWS will also charge you accordingly

We also need to know concept of regions and availability zones which will come here

You will create ec2 instance that is very close to your client location. Inside each region you have multiple availability zones as well

If there was a disaster recovery like short circuit or for some reason the region went down. To avoid this problem what AWS suggests is within a region we will have multiple availability zones.

For example if you have selected a region called London, then AWS says that we have availabilities on in North west and North east of London

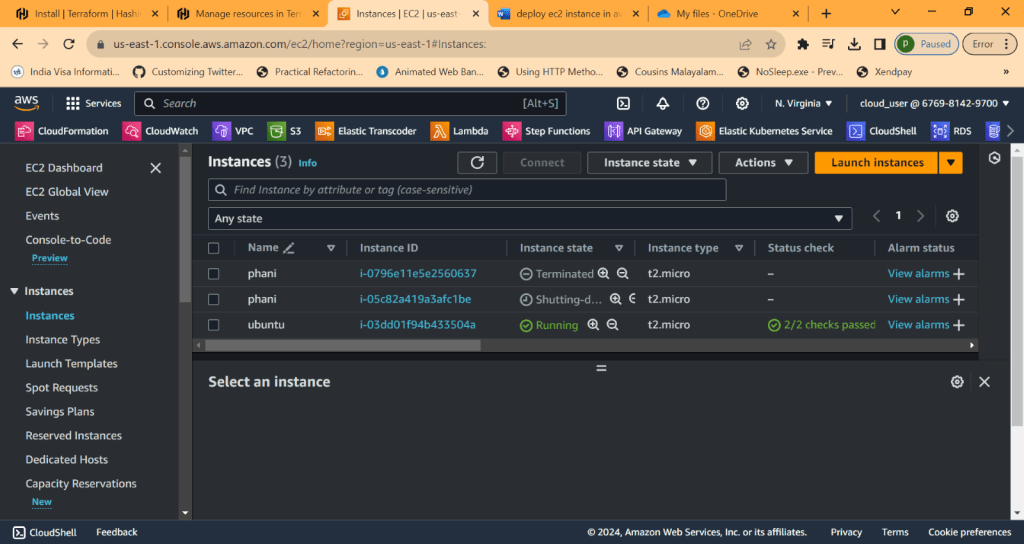
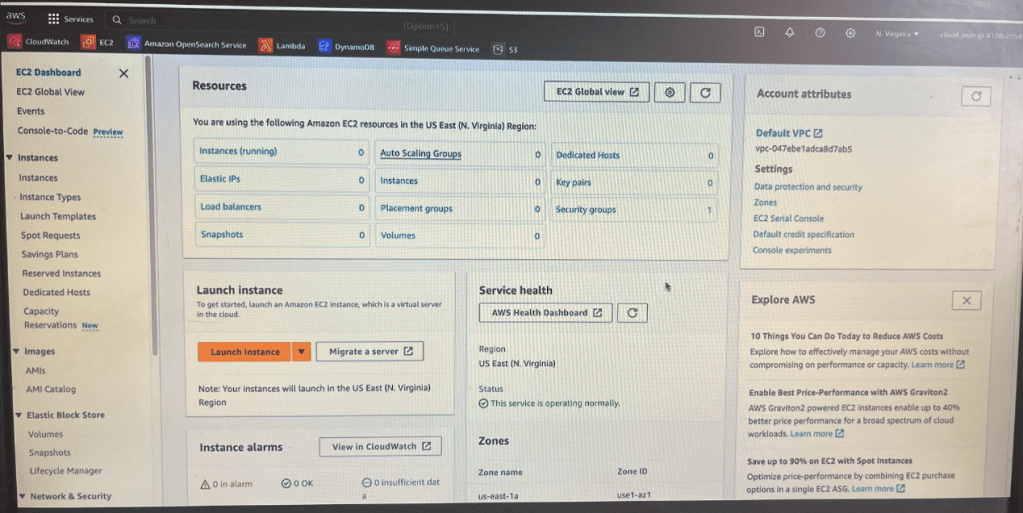
Now lets go to Ec2 instances and click on launch on instance

lets create phani-e2 instance. By default you have all of these operating systems 

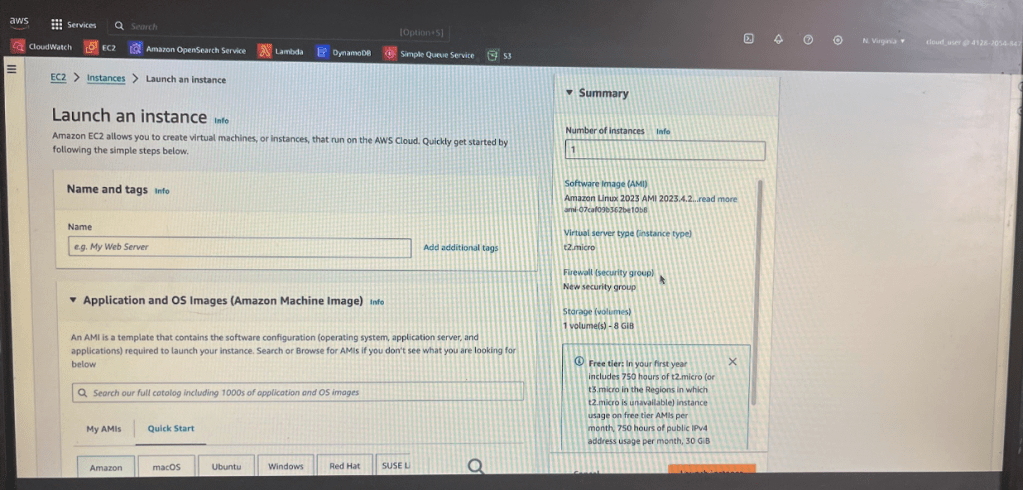
Lets select ubuntu server and select a version. I selected free -tier as if anything else aws willl charge me
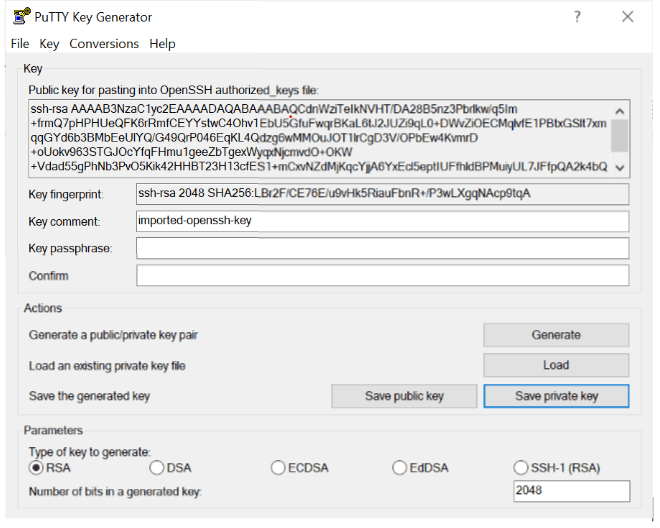
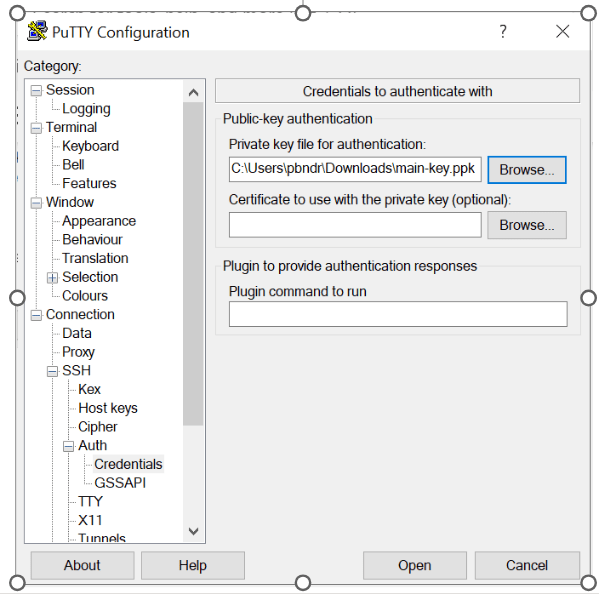
Authentication to the instance is disabled by default. The only way you can log into the instance is using key value pair.

key value pair is nothing but a combination of public private key which you use to log into the instance

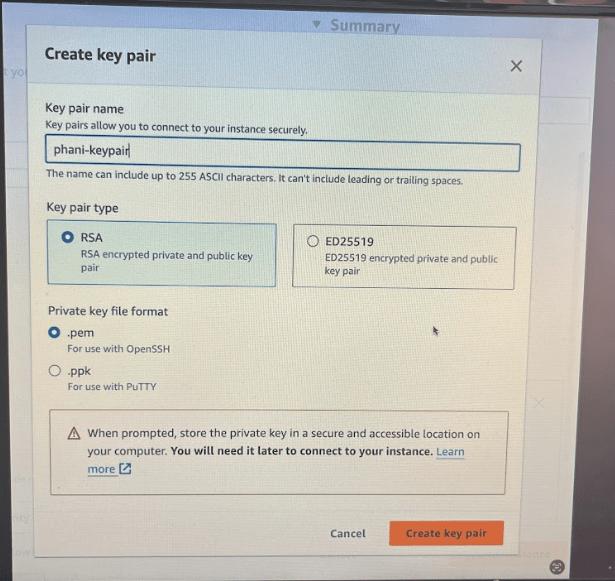
Lets create key pair. Here i create phani-keypair with .pem file format and store that file somewhere. here i stored in downloads folder

Lets ignore storage and networking for now.

Now launch instance. And use key value pair to login to that instance

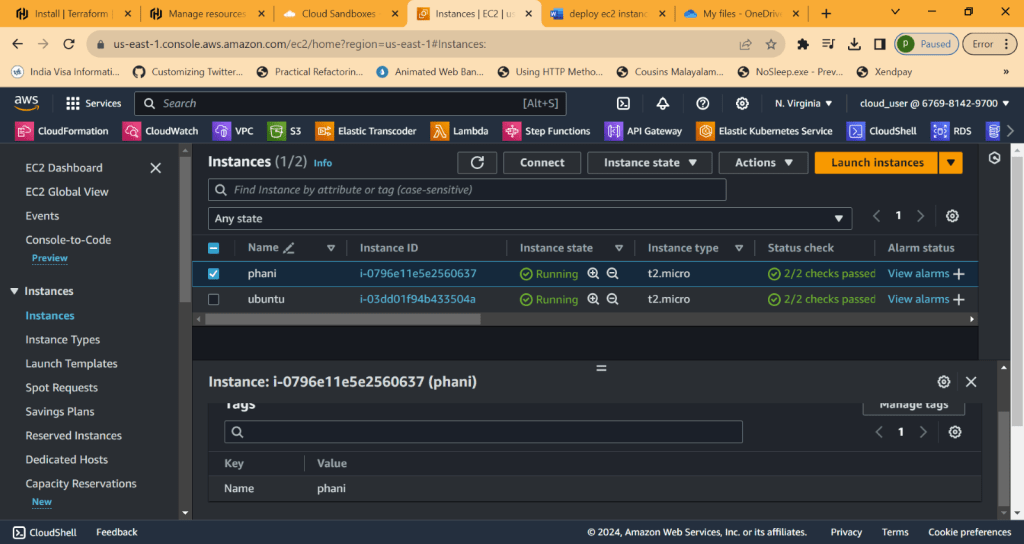
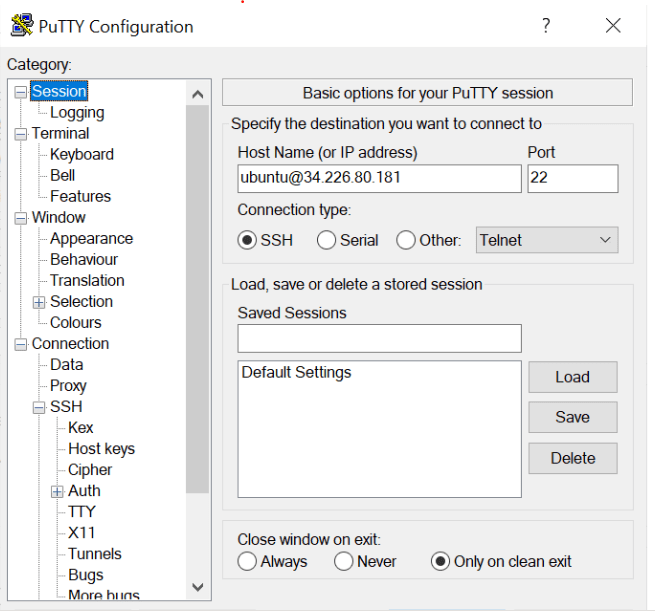
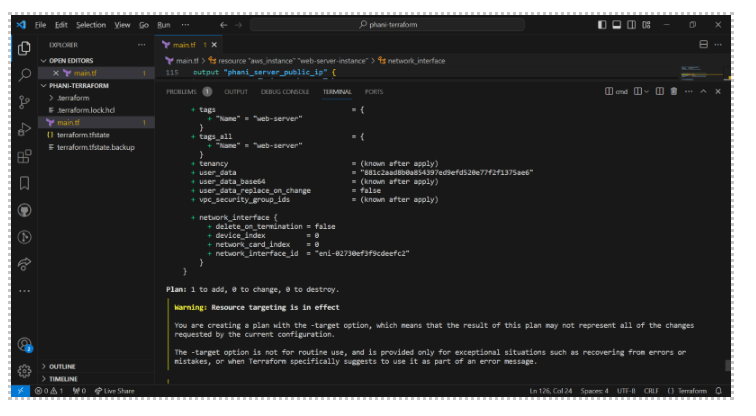
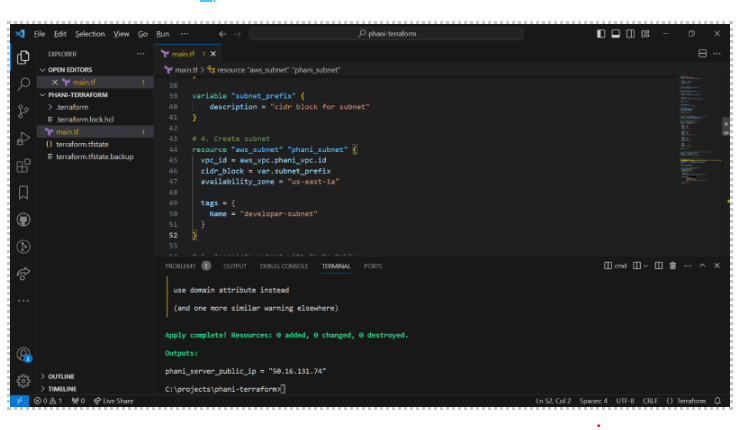
Now copy public ipv4 address shown in the pic.

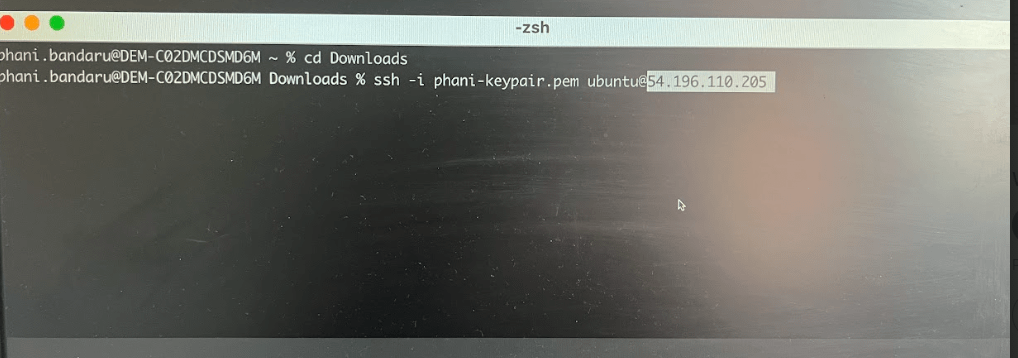
Lets go to your terminal and get your keypair file name and ipv4 address.

ssh -i phani-keypair.pem ubuntu@54.196.110.205

You will see the below error when trying to connect to that instance


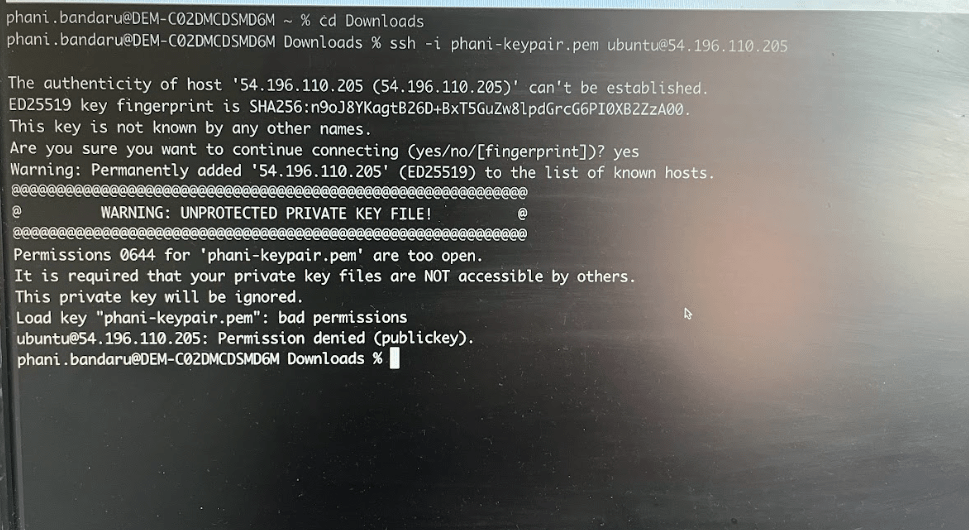
which means it is a very sensitive file which has lot of private key information
or sensitive information. you have to keep the permissions to open.

you can use a command called chmod to change the permissions of the file to 600

type in terminal chmod 600 phani-keypair.pem
Now I changed permission.

Now run ssh -i phani-keypair.pem ubuntu@54.196.110.205
Now I can log into ec2 instance

once you logged in, AWS will show you the private IP address of that server but you have logged in through the public IP address right so now you have technically inside the ec2 instance

Now what you need to do is you have to update the packages on this instance
Sudo command is needed if you are on the Ubuntu

Now run below command to update pakcages

sudo apt update

Now let’s try to deploy an application

Lets install Jenkins on that ubuntu server
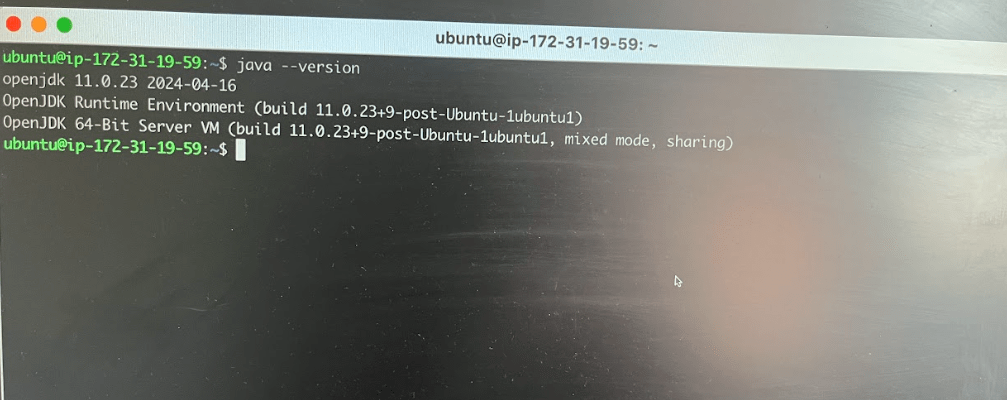
Preqrequisistes for Jenkins is to install java
So run the command

sudo apt install openjdk-11-jdk

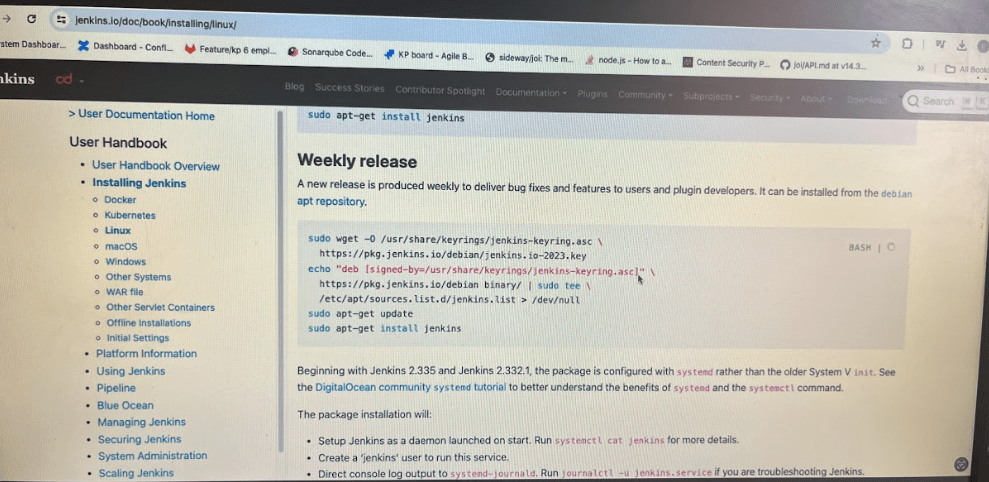
Now install Jenkins. Its bit of commands to use. you can google it and can see in below image

we will start the Jenkins service if it is not started and once the Jenkins
service is started you can try to access it from the browser
Let’s see if jenkins server is running
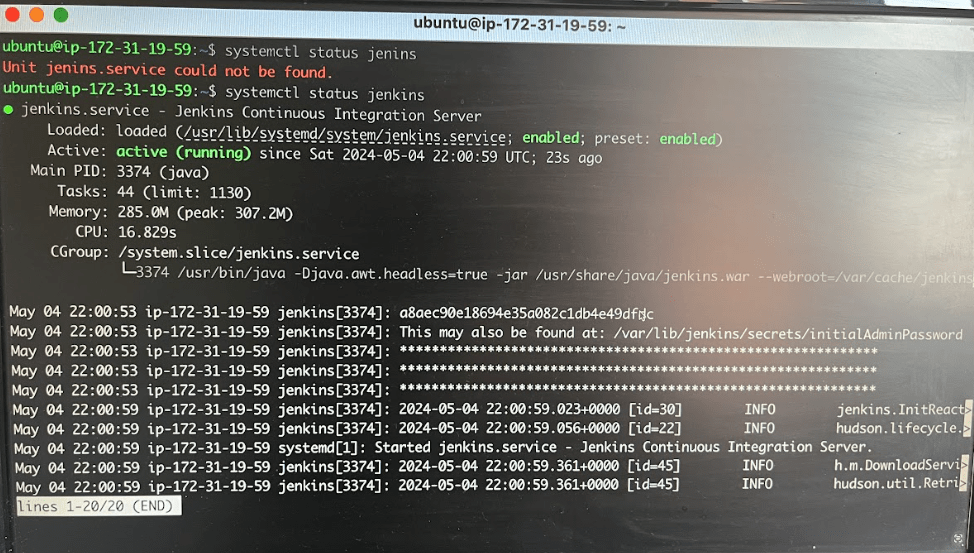

Use below command

systmectl status Jenkins


By default Jenkins runs on a port called 8080
Now go to browser and running http://publicipaddress:8080 . here ip address is 54.196.110.205
Now it don’t run
Now the instance is running . But your application by default it is not accessible to the external World there are lot of security and networking things that i will show you later.

Now i will show you how to open that port 8080 for now as shown below

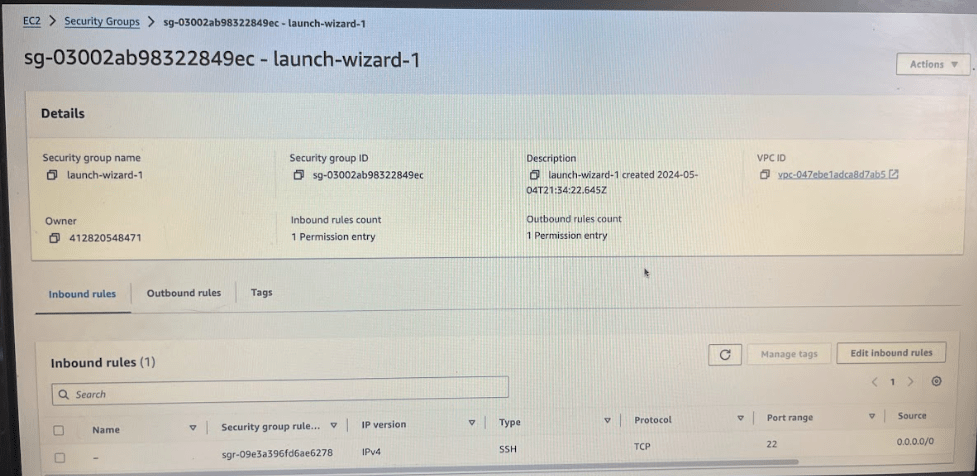
There is a security groups where it has inbound traffic rules and outbound traffic rules.
An inbound is a request which is coming inside AWS to your ec2 instance. An outbound is a request thats going outside
 Go to the security group and Edit inbound rules.

Here I’ll edit the inbound traffic rules and I will tell that I will add a new rule saying that I allow custom TCP code 8080 from anywhere in the world I’ll just say anywhere ipv4 and I’ll just save the rule 


Now go to browser and type http://54.196.110.205:8080/
You can see you are able to access Jenkins webpage


Hurray !!

We deployed our application to Jenkins on AWS and able to access it from outside world

AWS IAM

 IAM in AWS is an AWS service which will be doing authentication and authorization

Root user have access to everyone who will be devops person

Note: users, p0licies, groups are important to know
Roles is next we discuss later

Create a user named phani-user, by default a policy is created which is to change password for that user.

if want to add more policies, click on Add Permissions button and now you will see below screen

After creating a user, we can throw that user in a specific group. Like if you are a developer you will be added to developer group

some scenario like someone came to you to create a user for them and then you just said okay let me create a user so you’ll create an user in IAM dashboard

if you create a custom password then it will be very difficult for one person you create a password for another person to remember

Always use Auto generated password and use this option when creating user. When that user (phani-user) try to log in with the username and password that you have given, next time in the login they have to reset the password themselves.

At the moment we are not setting any policies when creating IAM user

Give this temporary password to the user.

Now lets log off and try to login with new user phani-user
Remember the aws account id and now login


Once you logged in, It prompts to change password


Now after login, if you just go to the bucket section and try to view the buckets list.

you will be seeing access denied permission issue.

This is not only about buckets anything you will not be able to do on this AWS account . Same for EC2 instances you don’t have access to to anything or any resource


To solve this problem to get access to specific resource
Example:
I should see all the buckets available in this account
So devops engineer will attach some policy called s3 list all my buckets to the user

Now login to root user, lets provide access to Phani-user

let’s click on the phani user and let’s try to attach some permissions. Now i am providing phani-user full access to s3 buckets

Now phani-user will be able to do everything in S3 like create, delete list and everything. Now you can see you have s3 bucket policy

Now log off and see that you are ableto see list of s3 bucks
Now go to s3 and see list of buckets. Now you don’t see any permission issue error


For example, To only view specific set of bucket types or anything specific related to that so in such case what you will write a custom policy you will not use a AWS manage policy

So depending on aws managed policies we can provide permission to access to IAM user particular services

So using user you can authenticate to AWS account and then you have policies where you can authorize few things for that user in AWS

Groups:

Lets create a group for deevelopers. let’s call them as Development Group and you provide them a policy with S3 list .

In future if they come back to you and say they want access to some other resource as well, then you can simply go to the group and you can just attach that new policy where all of them will get the access for

I created a development group with s3 full access policy


Go to User Groups in IAM and create phani-developer group

Now lets add an user to the group
Click on add users button
Now lets add phani-user to the group

if developers come back to you and say that want with this S3 full access they also want full access to EC2 .

Then instead of going and adding policy permission of these users, you can go to user groups – click on group – click on the permissions button and along with the S3 full access you can just come here and search for ec2 and click on the attach policies.

Now as you added ec2 permission , the users will automatically get access to EC2. If you go to Phani-user you can see those 2 policies s3 bucket and ec2 policies

Terraform

Terraform is to automate infrastructure process

I am using VSCode to write terraform code

once you created the terraform files,

inititalise the code

run terraform init – which will create working directory and install all plugins and modules

run terraform plan – will preivew changes before applying them

run terraform apply – which will apply all the changes

Now you will see in console

+ shows creating respource 

– deleting resouce 

~ modifying resouce 

now run terraform apply it says refreshing 

i will show codebase .

a provider needs to be created which can be aws or azure

i want to create aws instance and modify that instance by adding tag

tags = {
  Name = "phani"
}

Now run terraform apply, you can see update in place with tild symbol

Now go to AWS and check it

Now lets desroy,  phani-server resouce is going to destroy 

Terraform destroy

Now its terminated 

Now terraform apply again, which will deploy resource . created new one which shows as running. old one will be terminated

Now if you comment code in resource, terraform is intelligent enough to understand there are no rsources 

It will destroy

Unitl now we done deploying aws instances

Lets see other resources 

Now lets create subnet in vpc 

To quickly check it, 

Type terraform aws subnet in google

for subnet, we need to get vpc id. Terrform is intelligent to get it when typing

  vpc_id     = aws_vpc.phani_vpc.id 

Now run terraform apply and see all changes applied 

Now you can see aws subnet and aws vpc created

we can see cider block

Now lets go to subnet

There are default subnets created 

Lets see one created and you can seee vpc this subnet resides in 

And cider block 10.0.1.0/24

Also the order doesnt matter in code, you can create resource subnet first and then vpc. Terraform doesnt care about that 

Form console you can see code is writtern as subnet first and vpc later , 

In console, terraform creats vpc first and subnet later 

Note: after terrfaorm apply, we dont need to do yes all tht time. To overcome that just use 

terraform apply –auto-approve

Now lets do small project. please check the code

1. Create VPC

    2. Create Internet Gateway

    3. Create route table

    4. Create subnet

    5. Associate subnet with Route table

    6. Create security group to allow port 22, 80, 443

    7. create a network interface with an ip in the subnet that was created in step 4

    8. Assign an elastic IP to the network interface crated in step 7

    9. Cretae ubuntu server and install/enable apache2

    Code can be found in my github

    https://github.com/pbndru/Phani-Terraform/blob/main/main.tf

    Before running the code, you need to set 2 things access_key and secret_key where you can find them in your AWS account security credentials. create new access key from here. save the keys somewhere. Later it will be difficult to get it

    provider "aws" {
    region = "us-east-1"
    access_key = "" //set these values
    secret_key = ""
    }

    And you need to create key pair. go to EC2 Instances and go to key pair and create one. here i created main-key for webserver instance. it will be created with pem file. we need this file later

    key_name = "main-key"

    Now run terraform apply, it will create all resources in aws

    Now lets use putty and putty gen. please download these. we need these for connections to webserver with different protocols

    open putty gen

    Load the main-key.pem file created before and save private key to pkf file format 

    Now open putty 

    We need pem files for mac and ppk files for windows 

    Open putty and add host as ubuntu@ipaddress 

    Now load the ppk file. Now you will be connected to device 

    FOR MAC

    For MAc 

    We need to use  

    Chmod 400 main-key.pem 

    And then 

    Ssh –i main-key.pem ubuntu@34.226.80.181 

    Now you will be connected to device 

    TERRAFORM STATE COMMANDS

    If you want to see all resouces in command line quickly 

    RUN Terraform state list 

    Now you wll see all resources 

    to look into parituclar resource like aws_eip

    >terraform state show aws_eip.one

    We can see actual details like id , id instance, network interfae , ppublic ip and more

    TERRAFROM OUTPUT

    Everytime seeing state list and showing is bit typing 

    What about terraform do it when using terraform apply 

    We can use output and value to do what you want

    Here you can see , i created output which is like a log showing for 

    output "phani_server_public_ip" {
    value = aws_eip.one.public_ip
    }

    Output result as 

    phani_server_public_ip = "50.16.131.74" 

    You can also use terraform output to output all values for those resouces

    Now we dont want to accidently delete or deploy 

    We can use terraform reresh whichrefresh the state

    To delete paritcular resource we can use  –

    terraform destroy -target aws_instance.web-server-instance 

    To create it back use 

    terraform apply -target aws_instance.web-server-instance  

    Now you can see only 1 plan created 

    VARIBLES

    Here i creaed subnet_prefix variable and used in subnet 

    i created a file for variables trraform.tfvars where we use the variables

    subnet_prefix = ["10.0.1.0/24"]

    hope you enjoyed the article.

    Code in my github https://github.com/pbndru/Phani-Terraform/tree/main

    Strategy Design Pattern

    Before showing how this pattern works, please look at the code which has issues

    https://github.com/pbndru/Phani.ToRefactor

    Here in this code you can clearly see there is a tight coupling between services and the controller class

    When adding a new service language or removing one required changing SWITCH statements in the controller

    Also we need to change the unit tests

    Now this code can be changed using Strategy pattern

    Code for Stragey Pattern: https://github.com/pbndru/Phani.StrategyPattern

    In this code, you can see there is no tight coupling between developer provider classes and controller.

    Also when adding or removing provider, i dont need to change anything in this controller code

    Changing unit tests will be easy as we dont need to mock providers

    When adding new provider, we just need to add new LanguateType enum and

    add new provider . Asusual we need to registe the provider using Dependcy Injection

    .Net Core Api Cancellation token

    On API call, we usually get data from database or through Http request. Here in our API call, we get custom list of records and we add to console and check the results

    when we run through postman, we can get those results and the console output results

    Now , lets cancel the request in postman and check the output results

    Now i cancelled the request but still the results are returned

    To save the resources returning the results we can use cancellation token.

    Now when we cancel a request, it will throw TaskCancelledException

    By using this we are saving resources and thread pools and saving time by not running the task

    Code in my Github: https://github.com/pbndru/Phani.CancellationToken

    Nodejs Rest Api

    Lets build simple nodejs app with CRUD database operations

    I will be using MongoDB for DB

    Please install mongodb and check the server is runing by running mongo demon and mongo server:

    Now, lets create a database and a table

    I created phani-dev database and developers table and inserted rows.

    use above commands to insert

    Install the below npm packages

    express, morgan, helmet, monk, body-parser, eslint, nodemon, dotenv, joi

    express is a nodejs framework

    morgan is a middleware logger

    helmet is for HTTP header security

    monk: Its a tiny layer which provides improvements for MongoDb usage

    nodemon: Automatic restarting of our application when any file changes

    joi: its a validator

    Create an env variable file for our database

    Create a schema for our database

    Create a database connection

    Create middleware for handling errors

    Now in our main app lets use all the packages mentioned above and add a developer route

    Now, lets create a developer route with CRUD operations

    I created for all types of requests here

    api/developers – GET – return all developers

    api/developers/id – GET – return specific developer details

    api/developers – POST – add a new developer

    api/developers/id – PUT – update details for an existing developer

    api/developers/id – DELETE – delete developer

    Now, we are ready to run our application

    Get all developers by running: http://localhost/3000/api/developers

    Note: port is not specific

    You can see statuscode with success response

    Lets add a developer

    Lets update an existing developer

    Now lets see the updated results

    I updated by adding “p” to the end

    Lets DELETE a record

    Now run and see the results. we will see phani b developer deleted

    Thats it. hope you enjoyed the article

    Code in my Github: https://github.com/pbndru/phani-express-api

    Understanding Yield returns

    I have seen people get confused when using yield

    I will give a simple example

    In our app, we are getting list of 50,000 employee details and printing them

    Usually without yield, the code looks like

    Here, we are getting list of 50,000 records which we can assume they are getting from api or from db.

    Looping through the details and printing them

    If we have lots of records, and iterating them will be a heavy process and affects memory usage and performance

    One of the simple way is to use yield return to handle these type of situtations

    The only change we do is remove list of details to return and just return only single yield return in for loop

    Lets debug and see the results

    Here in watch window, you can see the details is empty. which doesnt have 50,000 records.

    When looping through we get the single record and only stores single item in memory .

    Now, i looped 5 times and you can see details object will have only one record. so it doesnt matter how many records the list will have.

    Code in my Github: https://github.com/pbndru/Phani.Yield

    Node js Express sessions using Redis

    Express session is used as express middleware session for data persistence

    Redis is an in-memory data-storage which uses key-value pair

    Lets talk about simple example how the whole thing works

    Lets think our application is using a load balancer like Nginx

    so, when user logged in , our express middleware will create a cookie and session id and stores it in redis storage and cookie is saved in users browser. the cookie saved in browser will be used to identify the redis session

    after login, the user will be using the access pages. so here when accessing pages, our express middleware will get the browser cookie and send it to redis to find matching session id. the express session variables can be accessed using req.session objects.

    Lets dive to example.

    Install redis https://redis.io/download

    After installing redis, run redis server and redis client

    These files will be in the path of download

    Lets run our redis server with the refis.conf file path specified

    redis-server.exe redis.windows.conf

    Now the redis server is running. it says port 6379. it will be the default port of redis client

    Now, run redis client by using redis-cli

    Test the client able to communicate with server by entering ping and server will respond with pong

    Now enter monitor to see sessions for client request

    Here we run a simple app

    Now, create a simple nodejs app and install required dependencies

    Now, our app server has the express session with port 6379 and running a simple web app on port 3000

    When run our app in browser, you can see our monitor redis client app will show the session id and cookie information with access and refresh tokens

    If you open the browser you can see the cookie results with cookie name and value which will match session id in redis

    Code in my Github: https://github.com/pbndru/phani.redissession

    Asp.Net Core Health Check

    Asp.net core has health check middleware which reports the health of our application.

    Health checks are done through Http endpoints where we can see live monitoring of the services. We can alos see disk spaces, memory and server resources performance

    Lets dive to the code

    I created 3 projects where Phani.DeveloperApi and TesterApi are services and Phani.HealthChecks is a monitoring service

    Lets install packages for our monitoring service. UI health checks is for better UI visiblity for dashboard.

    run on port 5000

    Now configure our services and middleware in starup

    And add the health Uri for both Developer and Tester services in appsettings.json running on port 5001/5002

    Now in DeveloperApi , we run on port 5001 and TesterAPI on port 5002

    Install packages

    Here we will be adding healthchecks in services and middleware

    Now, lets run our 3 services

    Now for the health checks , we can use the url: http://localhost:5000/healthchecks-ui

    Here we can see the 2 services Phani.DeveloperApi and Phani.TesterApi are running and can see the health status. There will be different health check statuses like Healthy, UnHealthy,Degraded.

    Code in my Github: https://github.com/pbndru/Phani.HealthChecks

    Mocha Testing

    Mocha is a JavaScript test framework for Node.js

    Lets build a simple application to test this

    Install mocha package as dev dependency

    Now in test folder, we will be adding a simple test js file

    Here we created a file named mochatests file in test folder.

    The pattern for Mocha is

    describe() – what group we are testing and can have nested describes for each feature

    and for main parent we can set some values in before() and after() functions to execute something for once

    And for child beforeEach() here it executes before each feature is completed. It means here after it() function we can set a value back and it() describes the test.

    to run test, use npm run test in terminal

    You can see all the tests are passed

    Code in my github: https://github.com/pbndru/phani.mocha